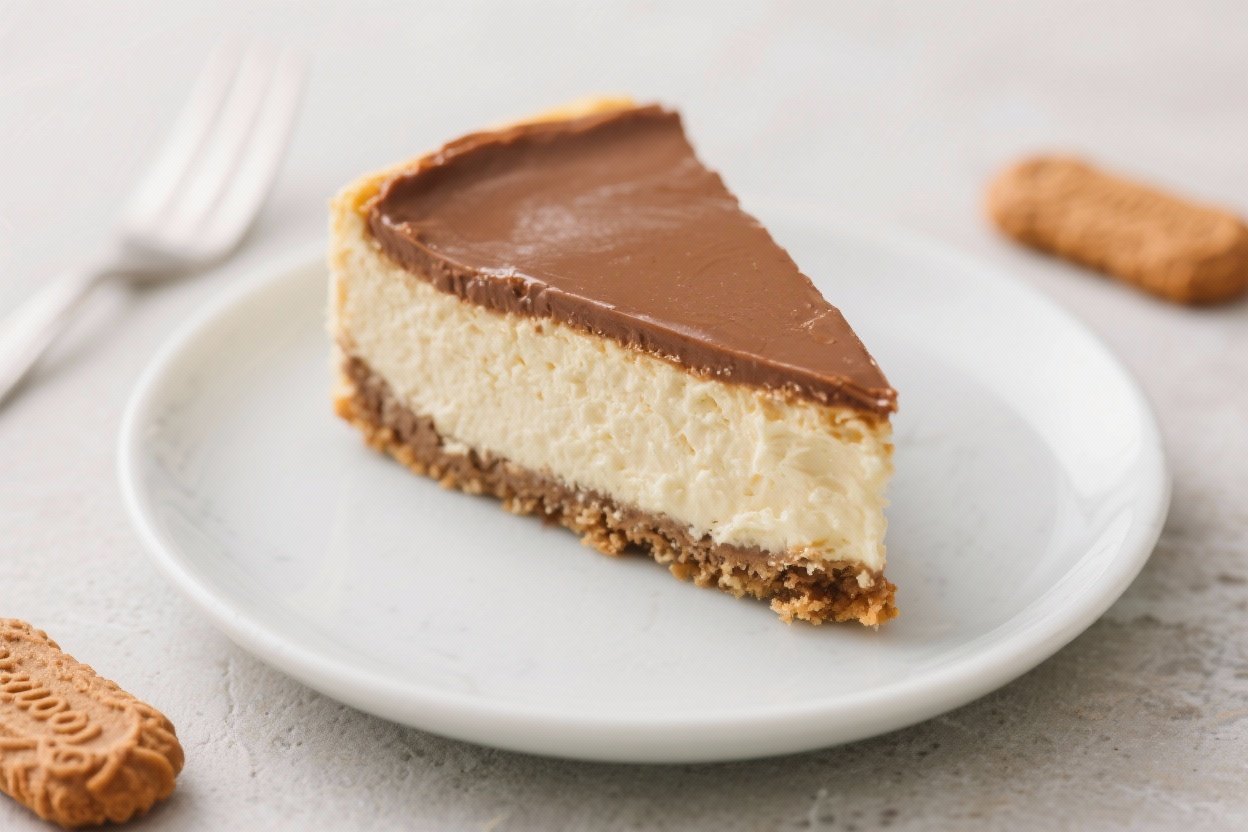
Decadent Biscoff Cheesecake With a Velvety Texture – Smooth, Rich, and Irresistible
This Biscoff cheesecake is the kind of dessert that turns a regular day into something worth celebrating. It’s silky, creamy, and full of that warm, spiced cookie flavor everyone loves. The texture is smooth and luxurious, and the flavor lands somewhere between caramel and cinnamon with a hint of butteriness.
No water bath, no fuss—just a reliable, show-stopping cheesecake that’s surprisingly simple to make. If you’re a fan of Biscoff, this one is definitely going on repeat.
What Makes This Recipe So Good
- Velvety texture: The batter mixes to a smooth, lush consistency, thanks to room-temperature ingredients and a touch of sour cream.
- Big Biscoff flavor: A crisp cookie crust, Biscoff spread in the filling, and a glossy Biscoff topping mean flavor in every bite.
- No water bath: A low-and-slow bake with a brief rest in the oven helps prevent cracks without the hassle.
- Make-ahead friendly: Cheesecake is best after a long chill, so you can prep it a day or two in advance.
- Crowd-pleaser: It slices cleanly, looks elegant, and tastes like a bakery treat.
Shopping List
- For the crust:
- 2 cups (200 g) Biscoff cookie crumbs
- 6 tablespoons (85 g) unsalted butter, melted
- 2 tablespoons granulated sugar (optional, for extra sweetness)
- Pinch of salt
- For the filling:
- 24 oz (680 g) full-fat cream cheese, room temperature
- 3/4 cup (150 g) granulated sugar
- 1 cup (240 g) Biscoff cookie butter (spread), room temperature
- 3 large eggs, room temperature
- 3/4 cup (180 g) sour cream, room temperature
- 1 teaspoon pure vanilla extract
- 1/4 teaspoon fine salt
- For the topping:
- 3/4 cup (180 g) Biscoff cookie butter
- 2–3 tablespoons heavy cream (to loosen)
- Crushed Biscoff cookies, for garnish
- Equipment:
- 9-inch springform pan
- Electric hand mixer or stand mixer
- Foil-lined baking sheet (to catch drips)
How to Make It
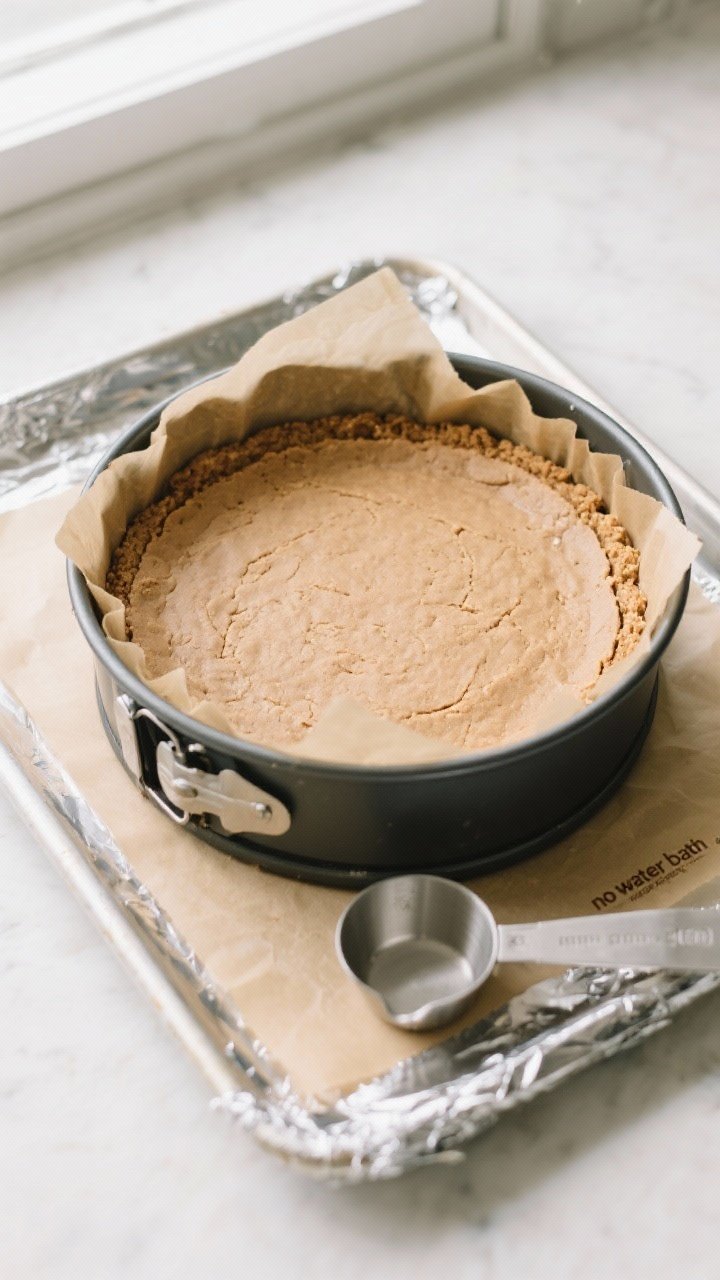
- Prep the pan and oven: Heat the oven to 325°F (165°C). Line the bottom of a 9-inch springform pan with parchment.
Lightly grease the sides.
- Make the crust: Mix Biscoff crumbs, melted butter, sugar, and salt until the texture resembles damp sand. Press firmly into the bottom and 1 inch up the sides of the pan. Use the bottom of a measuring cup to compact it.
- Pre-bake the crust: Bake for 8–10 minutes until fragrant.
Set aside to cool slightly while you make the filling.
- Beat the cream cheese: In a large bowl, beat cream cheese on medium speed until smooth and no lumps remain, about 2 minutes. Scrape the bowl well.
- Add sugar and salt: Mix in the granulated sugar and salt until creamy. Avoid whipping too much air into the batter.
- Blend in Biscoff and vanilla: Add the Biscoff spread and vanilla.
Beat until fully combined and silky.
- Add sour cream: Mix in sour cream just until smooth. Scrape the bowl again.
- Add eggs: Add the eggs one at a time on low speed, mixing just until incorporated. Do not overmix—this helps prevent cracks.
- Fill the pan: Pour the batter into the crust.
Tap the pan gently on the counter to release air bubbles.
- Bake low and slow: Place the pan on a foil-lined baking sheet. Bake at 325°F (165°C) for 50–60 minutes. The edges should be set, and the center should still wobble slightly like set Jell-O.
- Turn off the oven: Turn off the oven and open the door a crack.
Let the cheesecake rest inside for 45–60 minutes. This gradual cool prevents drastic temperature changes.
- Cool completely: Remove from the oven and cool to room temperature on a rack. Run a thin knife around the edge to loosen the sides.
- Chill overnight: Cover and refrigerate for at least 6 hours, ideally overnight, for the best texture and clean slices.
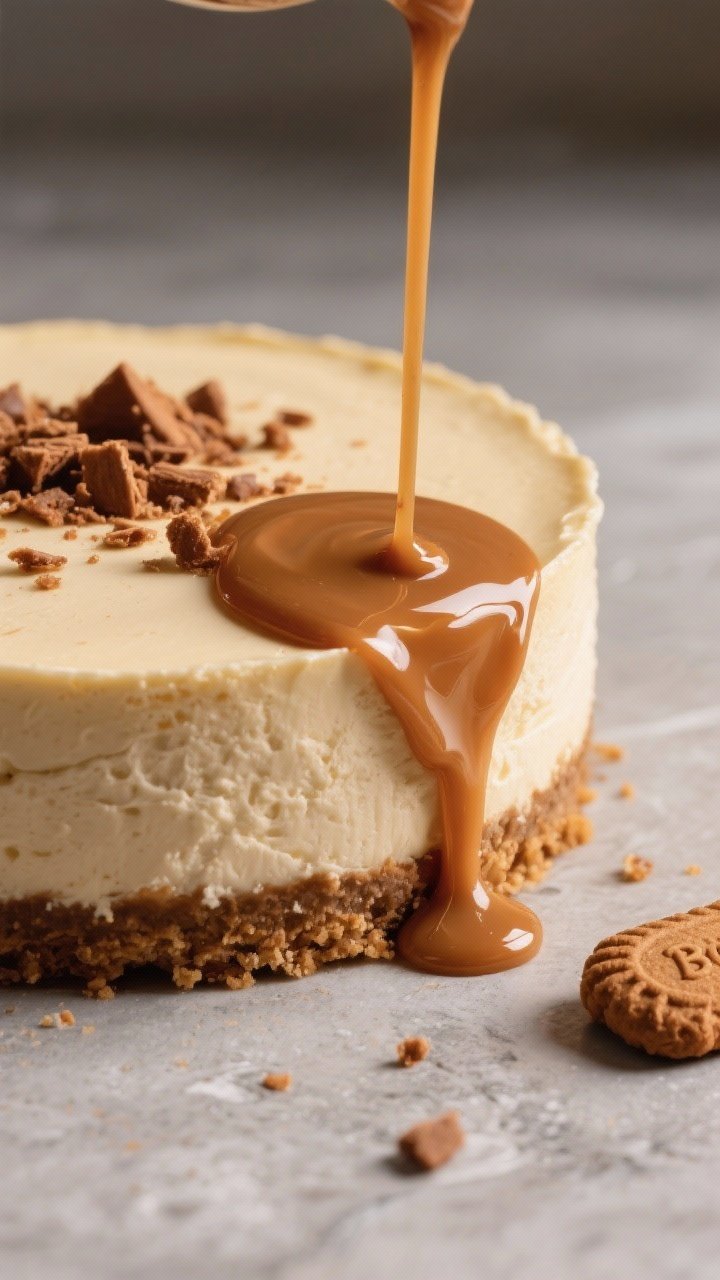
- Make the topping: Gently warm the Biscoff spread with heavy cream in the microwave in 10–15 second bursts.
Stir until smooth and pourable but not hot.
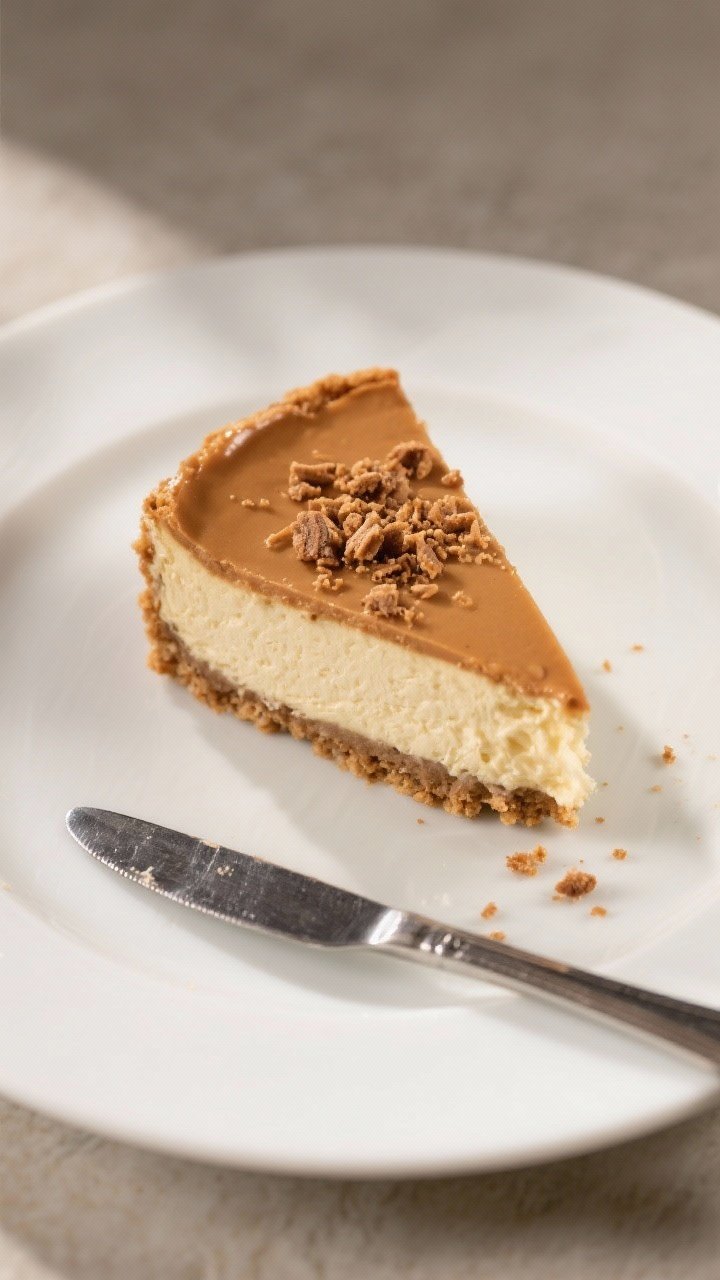
- Top and garnish: Pour the topping over the chilled cheesecake and spread to the edges. Sprinkle crushed Biscoff on top. Chill 15–20 minutes to set before slicing.
- Slice cleanly: Use a hot knife (warm under hot water, wipe dry) for neat slices.
Wipe the blade between cuts.
Storage Instructions
- Refrigerator: Store covered for up to 5 days. Keep it in the springform pan or a cake container to prevent drying out.
- Freezer: Freeze whole or in slices without the topping for up to 2 months. Wrap tightly in plastic, then foil.
Thaw overnight in the fridge and add the topping just before serving.
- Serving temperature: For the best texture, let slices sit at room temperature for 15–20 minutes before serving.
Benefits of This Recipe
- Reliable results: The method minimizes cracks, sinking, and dryness.
- Balanced sweetness: Biscoff brings warmth and caramel notes without being cloying.
- Beginner-friendly: Straightforward steps, common equipment, and no water bath required.
- Flexible timing: Make it a day ahead and relax on the day you serve.
- Show-stopping presentation: Clean layers and a glossy topping make it look bakery-level with minimal effort.
Common Mistakes to Avoid
- Cold ingredients: Cold cream cheese won’t blend smoothly and can cause lumps. Let everything come to room temperature.
- Overmixing: Too much air in the batter leads to cracks. Mix on low and stop when each ingredient is incorporated.
- Overbaking: Bake just until the center jiggles slightly.
A fully firm center in the oven means a dry cheesecake later.
- Skipping the rest: The gentle oven rest reduces sudden temperature changes and helps prevent cracking.
- Cutting too soon: Cheesecake needs a full chill to set. Rushing this step affects both texture and slices.
Variations You Can Try
- Swirled Biscoff: Reserve 1/4 cup of Biscoff spread. Dollop on top of the batter before baking and drag a skewer through for a swirl.
- Chocolate drizzle: Add a melted dark chocolate drizzle over the Biscoff topping for a bittersweet contrast.
- Espresso boost: Mix 1–2 teaspoons of instant espresso into the filling for a subtle coffee note that complements the spice.
- Mini cheesecakes: Use a muffin tin with liners.
Bake 15–18 minutes, rest briefly, then chill. Top individually.
- No-bake version: Skip eggs. Whip 8 oz (225 g) of cold heavy cream to soft peaks and fold into a mixture of cream cheese, sugar, sour cream, and Biscoff.
Set in the fridge 6–8 hours.
FAQ
Can I use low-fat cream cheese?
Using low-fat cream cheese will reduce richness and can make the texture less stable. For the best velvety texture, use full-fat.
What if I see a small crack?
A small crack won’t affect taste. Cover it with the Biscoff topping and crushed cookies, and it will look perfect.
Do I need a water bath?
Not for this recipe.
The controlled bake and gradual cool give a smooth result without one. If you prefer a water bath, you can use it, but it’s not required.
How do I make clean slices?
Use a long, sharp knife warmed under hot water, wipe it dry, and clean the blade between each cut. A chilled cheesecake slices best.
Can I reduce the sugar?
Yes, you can cut the filling sugar to 1/2 cup if you prefer less sweetness.
The Biscoff spread still provides plenty of flavor.
What’s the best way to crush the cookies?
Use a food processor for fine, even crumbs. If you don’t have one, place cookies in a zip-top bag and crush with a rolling pin.
Can I make this gluten-free?
Use gluten-free speculoos-style cookies for the crust and confirm your Biscoff-style spread is gluten-free. The filling itself is naturally gluten-free.
How long should it cool before chilling?
Cool to room temperature, about 1–2 hours, before covering and refrigerating.
Trapping heat can cause condensation on the surface.
Can I add a layer of caramel?
Yes. Spread a thin layer of salted caramel over the chilled cheesecake before the Biscoff topping. Keep it light so the flavors stay balanced.
Final Thoughts
This Biscoff cheesecake brings together a creamy, plush filling and a crisp, buttery crust for a dessert that feels truly special.
It’s easy to make, perfect for sharing, and always gets compliments. With a bit of patience for chilling, you’ll get a velvety, bakery-quality cheesecake at home. Keep this recipe handy—you’ll want to make it again and again.
Printable Recipe Card
Want just the essential recipe details without scrolling through the article? Get our printable recipe card with just the ingredients and instructions.