Hot Chocolate Layer Cake with Marshmallow Frosting: The Cozy Showstopper Your Winter Craves
Imagine your favorite mug of hot cocoa hit the gym, bulked up with layers, and learned a few party tricks. That’s this cake. It’s rich without being cloying, fluffy but still decadent, and crowned with a cloud of toasty marshmallow frosting that tastes like campfire nostalgia went to culinary school.
This is the dessert that makes people cancel their “no sugar” vows mid-slice. Serve it once and don’t be surprised when your group chat starts calling it “the cake.”
Why You’ll Love This Recipe
- Hot cocoa flavor in cake form: Cocoa powder plus melted chocolate gives you that deep, familiar hot chocolate vibe with a bakery-level finish.
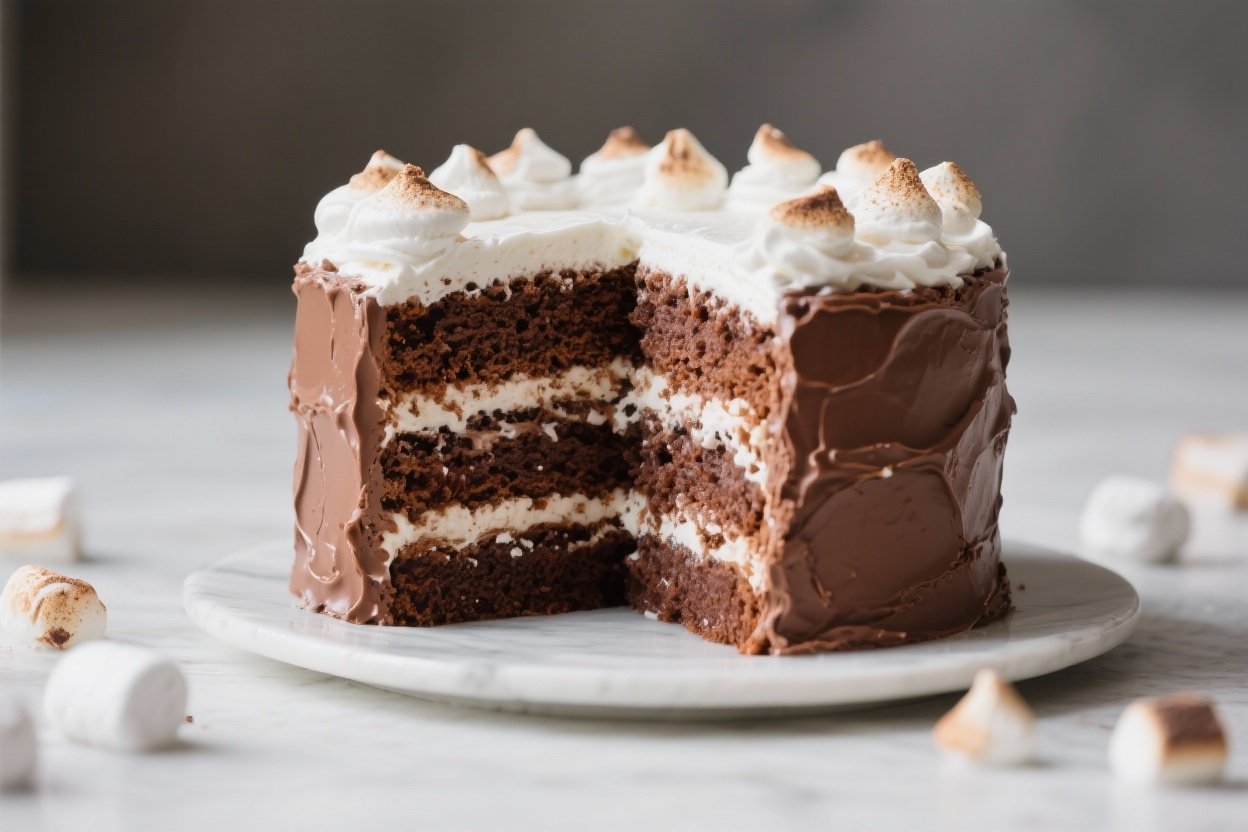
- Marshmallow frosting = drama: Glossy, swoopy, and lightly toasted if you want—this frosting steals the spotlight and asks for an encore.
- Moist, tender crumb: Buttermilk and oil keep layers plush for days. No dry cake slander here.
- Party-proof: Bakes into three even layers that stack like a dream and slice cleanly.
Instagram loves symmetry.
- Flexible ingredients: Pantry staples, optional espresso powder for depth, and easy swaps for dairy-free or gluten-free needs.
Ingredients
For the Hot Chocolate Cake
- 2 cups (260 g) all-purpose flour
- 1 3/4 cups (350 g) granulated sugar
- 3/4 cup (75 g) unsweetened cocoa powder (Dutch-process preferred)
- 2 teaspoons baking powder
- 1 1/2 teaspoons baking soda
- 1 teaspoon fine sea salt
- 1 teaspoon instant espresso powder (optional, boosts chocolate)
- 2 large eggs, room temperature
- 1 cup (240 ml) buttermilk, room temperature
- 1/2 cup (120 ml) neutral oil (canola or vegetable)
- 2 teaspoons pure vanilla extract
- 1/2 cup (90 g) chopped dark chocolate, melted and slightly cooled
- 1 cup (240 ml) hot brewed coffee or hot water
For the Marshmallow Frosting (Swiss Meringue Style)
- 4 large egg whites
- 1 cup (200 g) granulated sugar
- 1/4 teaspoon cream of tartar
- 1 teaspoon pure vanilla extract
- Pinch of fine sea salt
Optional Fillings and Finish
- 1/2 cup mini marshmallows (between layers)
- Chocolate shavings or cocoa powder for garnish
- Flaky sea salt to finish
Instructions
- Prep your gear: Heat oven to 350°F (175°C). Grease and line three 8-inch round cake pans with parchment. If using two 9-inch pans, increase bake time slightly.
- Whisk dry mix: In a large bowl, whisk flour, sugar, cocoa, baking powder, baking soda, salt, and espresso powder.
Break up any cocoa clumps.
- Combine wet ingredients: In another bowl, whisk eggs, buttermilk, oil, and vanilla until smooth. Stir in melted chocolate.
- Make the batter: Pour wet into dry and whisk gently. Stream in hot coffee/water and whisk until just combined.
Batter will be thin—this is right.
- Bake: Divide evenly among pans. Bake 22–26 minutes for 8-inch layers (25–30 for 9-inch), until a toothpick comes out with a few moist crumbs.
- Cool completely: Let cakes cool 10 minutes in pans, then turn out onto racks and cool fully. Level domes with a serrated knife if needed.
- Make marshmallow frosting: In a heatproof bowl over a gently simmering pot (double boiler), whisk egg whites, sugar, cream of tartar, and salt.
Heat, whisking constantly, until sugar dissolves and mixture reaches about 160°F (71°C) or feels hot and slick with no grains between fingers.
- Whip to glossy peaks: Transfer to a stand mixer. Whip on high 6–8 minutes until stiff, glossy peaks form and bowl is cool. Beat in vanilla.
Use immediately.
- Assemble: Place first cake layer on a board. Add a generous scoop of frosting, spread to edges. Sprinkle a few mini marshmallows if using.
Repeat with second layer.
- Finish the exterior: Add the third layer and frost the top and sides in swoops. For toasted vibes, use a kitchen torch to kiss the frosting until golden in spots.
- Garnish and set: Add chocolate shavings and a pinch of flaky sea salt. Let the cake sit 20 minutes before slicing for clean cuts.
Storage Instructions
- Room temp: Keep covered at cool room temperature up to 2 days if not torched.
If torched, same timeline, but avoid humid rooms.
- Refrigerator: Store covered up to 4 days. Let slices sit 20–30 minutes before serving so the crumb softens.
- Freezer: Freeze unfrosted cake layers wrapped well up to 2 months. Thaw in the fridge overnight.
Marshmallow frosting doesn’t freeze great—make fresh.
Nutritional Perks
- Cocoa brings antioxidants: Flavonoids add a tiny health halo to all this indulgence. We love balance.
- Oil-based cake = less saturated fat: Using oil instead of butter keeps the crumb tender with a lighter fat profile.
- Protein from egg whites: The frosting adds structure and a bit of protein without heavy cream.
Is this health food? No.
But compared to some butter bombs, it’s a kinder slice. FYI, portion control is a feature, not a bug.
Pitfalls to Watch Out For
- Grainy frosting: If sugar doesn’t fully dissolve before whipping, you’ll get sandy meringue. Heat it properly and test by rubbing between fingers.
- Deflated frosting: Any fat (yolk, grease in bowl) kills volume.
Wipe bowls and whisks with vinegar to degrease.
- Dry cake layers: Overbaking is the enemy. Pull when a few moist crumbs cling to the tester.
- Tearing layers: Warm cake is fragile. Cool completely and consider chilling layers 30 minutes before stacking.
- Weeping meringue: High humidity or under-whipped meringue can bead.
Whip to stiff peaks and avoid storing in very damp environments.
Recipe Variations
- Mexican Hot Chocolate: Add 1 teaspoon ground cinnamon and a pinch of cayenne to the cake batter. Finish with cinnamon sugar dusting.
- Mocha Mash-Up: Swap half the hot water for strong espresso and add coffee beans as garnish.
- Gluten-Free: Use a 1:1 gluten-free flour blend with xanthan gum. Increase bake time by 2–4 minutes and cool fully before stacking.
- Dairy-Free: Use oat milk plus 1 tablespoon lemon juice in place of buttermilk.
Check your dark chocolate and cocoa are dairy-free.
- S’mores Stack: Add a thin layer of crushed graham crackers between layers with the frosting. Torch the exterior aggressively (safely!).
- Peppermint Party: Add 1/2 teaspoon peppermint extract to frosting and sprinkle with crushed candy canes.
FAQ
Can I make the cake layers ahead?
Yes. Bake, cool, wrap tightly, and refrigerate up to 3 days or freeze up to 2 months.
Thaw in the fridge overnight before frosting.
Do I have to use coffee in the batter?
No, hot water works. Coffee simply intensifies the chocolate flavor without making it taste like coffee. If you’re coffee-averse, skip it and you’ll still get a rich cake.
Can I frost with buttercream instead?
Absolutely.
A chocolate or vanilla buttercream works great. The marshmallow frosting is lighter and more “hot cocoa” themed, but you do you.
How do I toast the marshmallow frosting without a torch?
Briefly place the whole cake under a hot broiler, watching like a hawk, and rotate for even color. Keep distance from the element and don’t blink—30–60 seconds total.
Why did my meringue collapse?
Likely fat contamination or under-whipping.
Make sure the sugar dissolves, bowls are grease-free, and whip to stiff glossy peaks. If it still slumps, chill 10 minutes and re-whip.
Can I make this as cupcakes?
Yes. Fill liners two-thirds full and bake 16–20 minutes.
Pipe marshmallow frosting high and toast lightly for mini campfire vibes.
What’s the best way to get clean slices?
Chill the cake 20–30 minutes, use a long sharp knife, and wipe the blade between cuts. Bonus: warm the knife under hot water, then dry before slicing.
My Take
This cake is the holiday sweater of desserts—comforting, a little flashy, and impossible to ignore. The crumb is plush, the chocolate hits like nostalgia, and the marshmallow frosting delivers that gooey, toasty payoff.
It’s impressive without being high-maintenance, which IMO is the sweet spot for celebration baking. Make it once and it becomes your cold-weather signature—like hot chocolate, but dressed to the nines.
Printable Recipe Card
Want just the essential recipe details without scrolling through the article? Get our printable recipe card with just the ingredients and instructions.