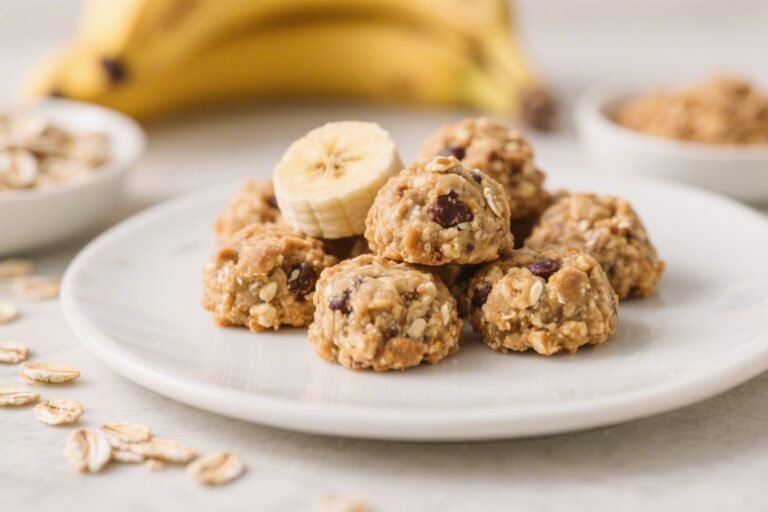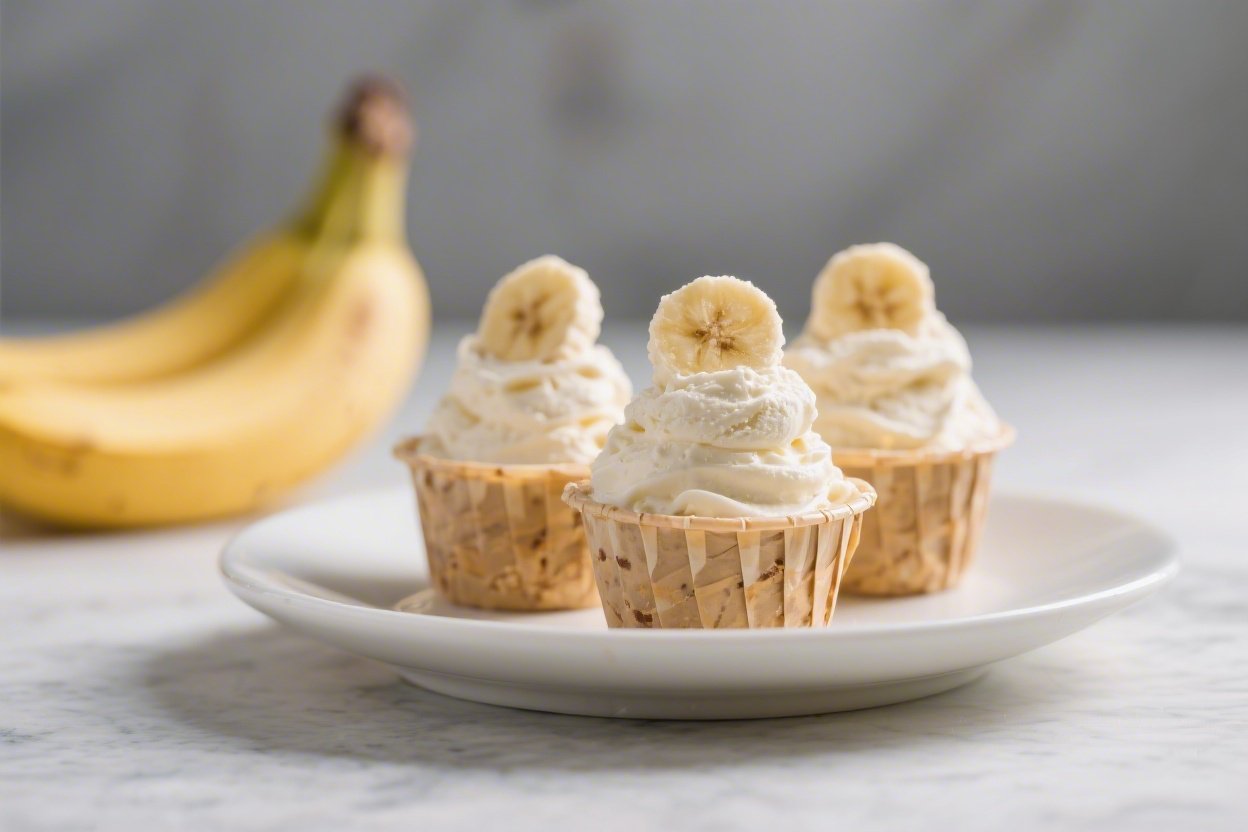
No-Bake Banana Nice Cream Cups – Creamy, Easy, and Naturally Sweet
If you love creamy desserts but want something light and wholesome, these No-Bake Banana Nice Cream Cups are a sweet spot. They’re cool, creamy, and made with simple ingredients you probably have at home. No oven, no complicated steps, and no refined sugar if you don’t want it.
Just a chilled treat that feels special but takes minimal effort. They’re perfect for weeknights, hot days, or a make-ahead dessert that won’t weigh you down.
What Makes This Recipe So Good
- No bake, no fuss: You only need a blender and a muffin tin. The freezer does the rest.
- Naturally sweet: Ripe bananas bring all the creamy sweetness—no heavy cream or added sugar required.
- Customizable: Swap the nut butter, add chocolate, or fold in fruit.
It’s easy to make it your own.
- Freezer-friendly: Make a batch and keep them on hand for a quick dessert or snack.
- Dairy-free and vegan-friendly: Use plant-based milk and chocolate to keep it fully vegan.
Ingredients
- For the crust:
- 1 cup pitted Medjool dates (about 10–12), softened if dry
- 1 cup raw nuts (almonds, walnuts, or cashews)
- 2 tablespoons unsweetened shredded coconut (optional)
- 1/4 teaspoon fine sea salt
- 1 teaspoon vanilla extract
- For the nice cream:
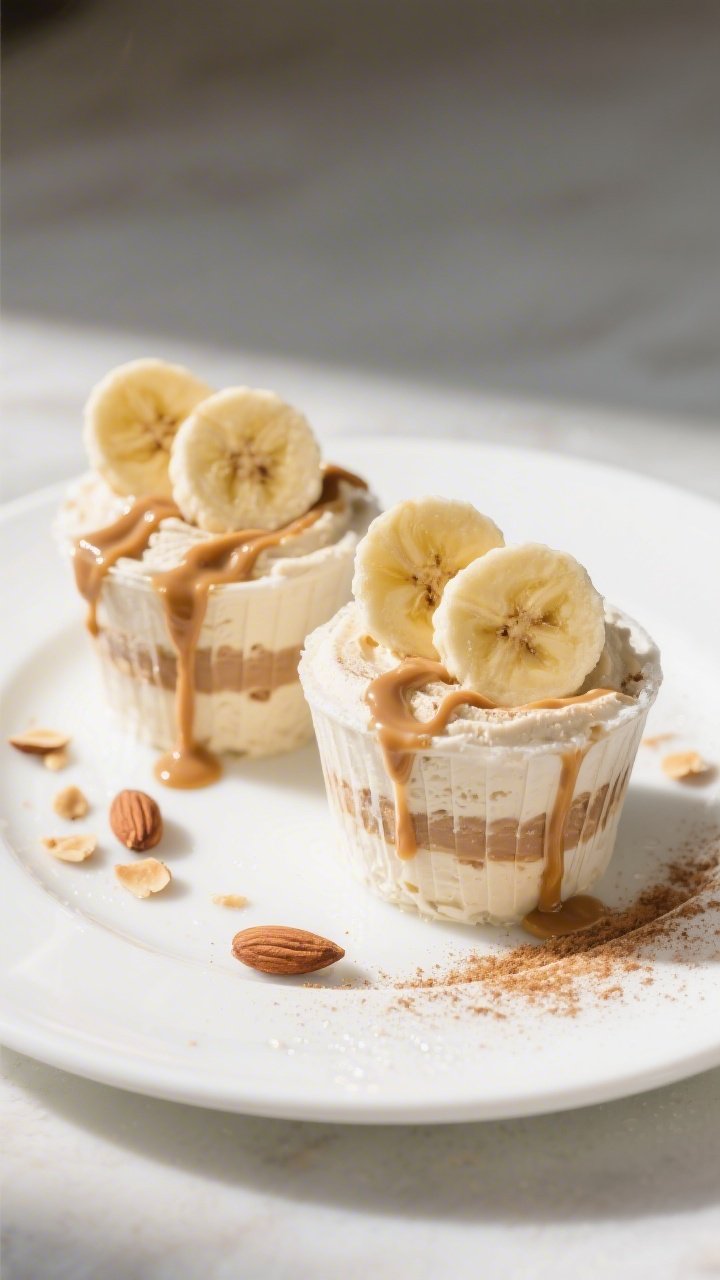
- 3 large ripe bananas, sliced and frozen
- 2–3 tablespoons unsweetened almond milk (or any milk)
- 2 tablespoons nut butter (peanut, almond, or cashew)
- 1/2 teaspoon cinnamon
- 1 teaspoon vanilla extract
- Pinch of sea salt
- Optional add-ins and toppings:
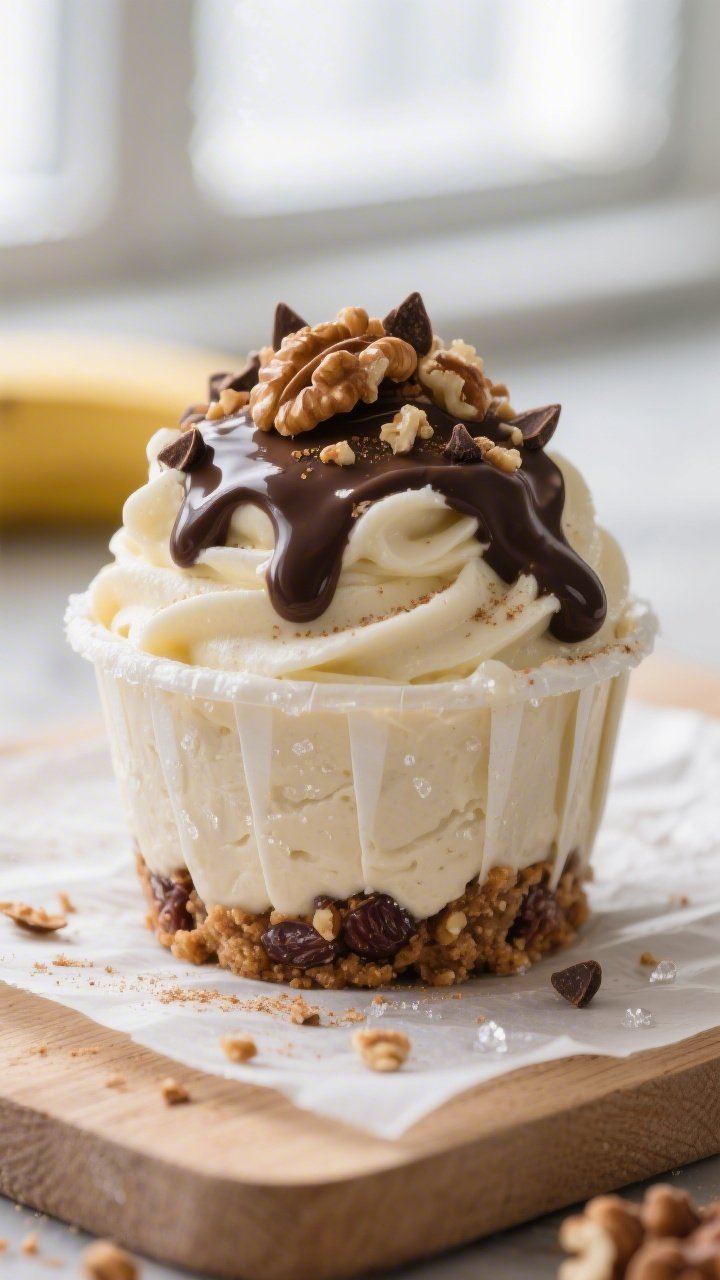
- Dark chocolate chips or chopped chocolate
- Crushed nuts or cacao nibs
- Fresh berries or sliced banana
- Drizzle of melted chocolate or nut butter
Instructions
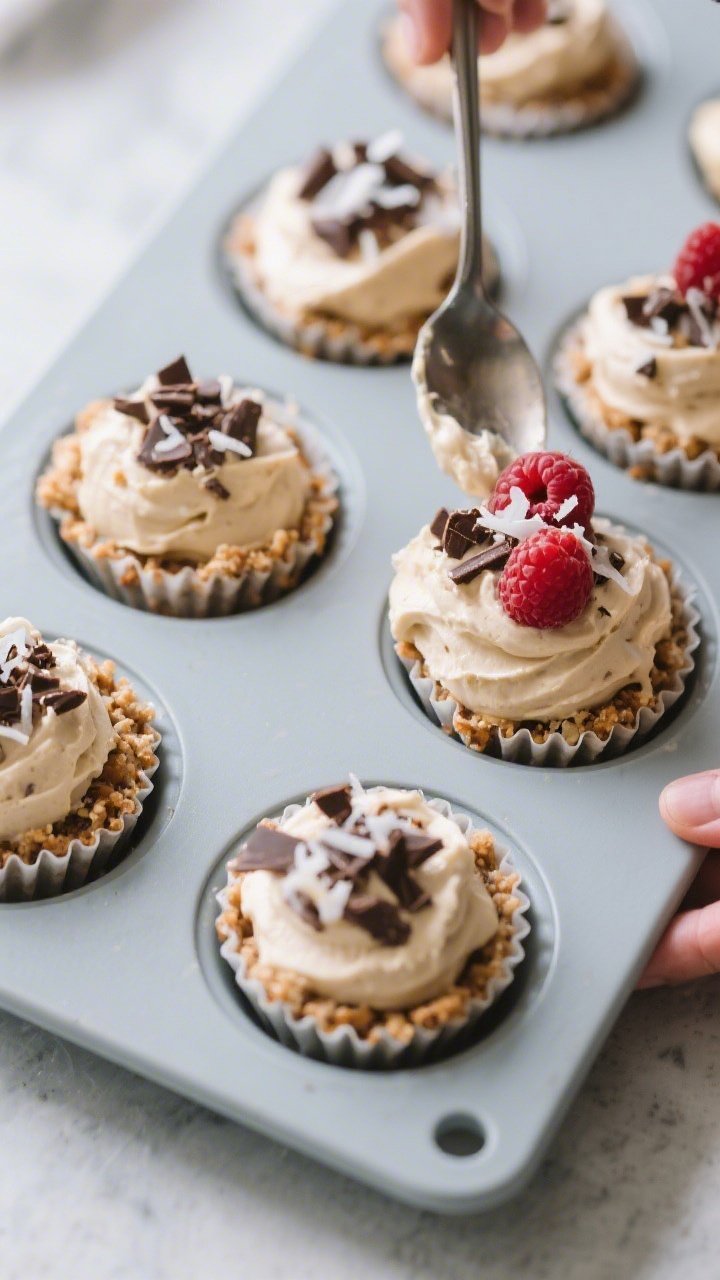
- Prep your pan: Line a 12-cup muffin tin with paper liners or use a silicone muffin tray. This makes removing the cups easy.
- Make the crust: Add dates, nuts, coconut (if using), salt, and vanilla to a food processor. Pulse until the mixture sticks together when pressed.
If it’s too dry, add 1 teaspoon of water at a time.
- Press the base: Divide the crust mixture evenly among the muffin cups. Press firmly into an even layer. Place the tray in the freezer while you make the nice cream.
- Blend the nice cream: Add frozen banana slices, milk, nut butter, cinnamon, vanilla, and a pinch of salt to a high-speed blender or food processor.
Blend, stopping to scrape down the sides, until smooth and creamy. Add a splash more milk if needed, but keep it thick.
- Assemble: Spoon the banana nice cream over the chilled crusts, filling each cup to the top. Smooth the surface with the back of a spoon.
- Add toppings: Sprinkle on chocolate chips, nuts, or berries.
Press gently so they stick.
- Freeze to set: Freeze for 2–3 hours, or until firm enough to unmold and hold their shape.
- Serve: Let the cups sit at room temperature for 5–10 minutes before eating to soften slightly. Peel off the liner and enjoy.
How to Store
- Short term: Keep the cups in an airtight container in the freezer for up to 2 weeks.
- Prevent freezer burn: Once frozen, transfer them to a container and place parchment between layers.
- Thawing: Leave at room temperature for 5–10 minutes, or in the fridge for 20–30 minutes before serving.
- Make ahead: Great for meal prep. Assemble, freeze, and grab one whenever a craving hits.
Health Benefits
- Bananas for natural sweetness: Ripe bananas provide sweetness, potassium, and fiber without added sugar.
- Healthy fats from nuts: The crust and nut butter bring monounsaturated fats that support heart health and help with fullness.
- Dairy-free option: Using plant milk keeps it lighter and friendly for lactose-intolerant or vegan eaters.
- Whole-food ingredients: Dates, nuts, and bananas offer vitamins, minerals, and fiber—no ultra-processed mix-ins needed.
- Portion-controlled: Individual cups make it easier to enjoy dessert without overdoing it.
Common Mistakes to Avoid
- Using underripe bananas: Green or just-yellow bananas won’t be sweet or creamy enough.
Choose very ripe, spotty bananas.
- Over-blending with too much liquid: Adding too much milk makes the mixture icy. Start with a small splash and only add more if needed.
- Skipping the liners: Without liners or a silicone tray, the cups can stick and fall apart.
- Not freezing long enough: If you rush this step, the cups won’t hold their shape. Give them a solid 2–3 hours.
- Dry crust: If the crust won’t hold together, your dates may be dry.
Soak them in warm water for 10 minutes and drain well before processing.
Variations You Can Try
- Chocolate swirl: Fold in 2 tablespoons of cocoa powder to the nice cream or drizzle melted dark chocolate on top.
- Peanut butter cup: Use peanut butter in the filling and add a layer of melted chocolate over each cup before freezing.
- Berry burst: Stir in chopped strawberries or raspberries right before spooning into the cups.
- Tropical twist: Add 1/2 cup frozen pineapple or mango to the blender and a sprinkle of toasted coconut on top.
- Cookie crumble: Press a thin layer of crushed graham crackers or chocolate cookies into the base before adding the crust mixture for extra texture.
- Protein boost: Blend in a scoop of vanilla or chocolate protein powder and a touch more milk to help it blend.
FAQ
Can I make these without nuts?
Yes. Replace the nuts in the crust with rolled oats and seeds (like sunflower or pumpkin seeds). Use seed butter (sunflower seed butter or tahini) in the filling.
Check chocolate labels to ensure they’re nut-free if needed.
Do I need a high-powered blender?
A high-speed blender or food processor works best. If yours is weaker, slice bananas thin before freezing and let them sit at room temp for a few minutes before blending. Pulse and scrape down often, adding small splashes of milk as needed.
How ripe should the bananas be?
Very ripe, with plenty of brown spots.
The riper the banana, the creamier and sweeter the nice cream will taste.
Can I use fresh bananas instead of frozen?
Frozen bananas are key for that ice-cream-like texture. If you only have fresh, blend the filling and then freeze it longer, but the texture may be icier.
What can I use instead of dates in the crust?
You can use dried figs or raisins, though the flavor will change slightly. If you prefer a less sweet crust, try a blend of oats, nuts, 1–2 tablespoons maple syrup, and a bit of coconut oil to bind.
How do I prevent the cups from getting too hard?
Keep the liquid to a minimum in the filling and let the cups sit out for a few minutes before serving.
You can also store them in the fridge for 15–20 minutes to soften gently.
Are these good for kids?
Absolutely. They’re naturally sweet, fun to decorate, and easy to hold. Skip hard toppings for very young kids and watch for nut allergies.
Can I double the recipe?
Yes.
Use two muffin pans or work in batches. The crust and filling scale well; just don’t overcrowd the blender.
What if I don’t have a muffin tin?
Use a silicone ice cube tray or small ramekins. You can also press the crust into an 8×8-inch pan, spread the filling on top, freeze, and slice into bars.
How long do they last in the freezer?
For best taste and texture, enjoy within 2 weeks.
They’re safe to eat longer, but they may pick up freezer flavors over time.
Final Thoughts
No-Bake Banana Nice Cream Cups are proof that dessert can be easy, satisfying, and full of simple ingredients. They’re creamy, cold, and endlessly customizable. Make a batch on Sunday, and you’ll have a week’s worth of feel-good treats ready to go.
Whether you top them with chocolate, fruit, or nuts, they’re a reliable favorite for anyone who loves a sweet bite without the fuss.
Printable Recipe Card
Want just the essential recipe details without scrolling through the article? Get our printable recipe card with just the ingredients and instructions.