
Crispy Oven-Baked Chicken Chimichangas (No Deep Frying Required) – Easy, Flavor-Packed Comfort Food
Skip the mess of deep frying and still get that crunchy, golden bite. These oven-baked chicken chimichangas deliver everything you love about the classic—melty cheese, warm spices, and a crisp tortilla—without a pot of hot oil. The method is simple, the results are impressive, and cleanup is a breeze.
Whether you’re feeding a weeknight crowd or prepping lunches, this recipe is reliable, customizable, and delicious.
What Makes This Recipe So Good
- Crispy without frying: A quick brush of oil and high heat give the tortillas a satisfying crunch.
- Weeknight-friendly: Comes together with pantry staples and cooked chicken, like rotisserie or leftovers.
- Big flavor, minimal mess: Bold spices, a touch of salsa, and melty cheese make every bite pop.
- Customizable: Swap the protein, adjust the heat level, or use your favorite tortillas and toppings.
- Freezer-friendly: Make a batch and bake straight from frozen when you need an easy meal.
Shopping List
- Cooked chicken: 3 cups, shredded (rotisserie works great)
- Onion: 1 small, finely diced
- Garlic: 2 cloves, minced
- Green chiles: 1 (4-ounce) can, diced (mild or hot)
- Salsa: 1/2 cup (red or green)
- Cream cheese or sour cream: 4 ounces cream cheese (softened) or 1/2 cup sour cream
- Shredded cheese: 1 1/2 cups (Monterey Jack, cheddar, or a Mexican blend)
- Black beans: 1 cup, drained and rinsed (optional)
- Corn kernels: 1/2 cup (optional)
- Spices: 2 teaspoons chili powder, 1 teaspoon ground cumin, 1/2 teaspoon smoked paprika, 1/2 teaspoon oregano, 1/2 teaspoon salt, 1/4 teaspoon black pepper
- Flour tortillas: 6–8 large (10-inch burrito size)
- Neutral oil: 2–3 tablespoons (avocado, canola, or light olive oil)
- Lime: 1, for finishing
- Fresh cilantro: A handful, chopped (optional)
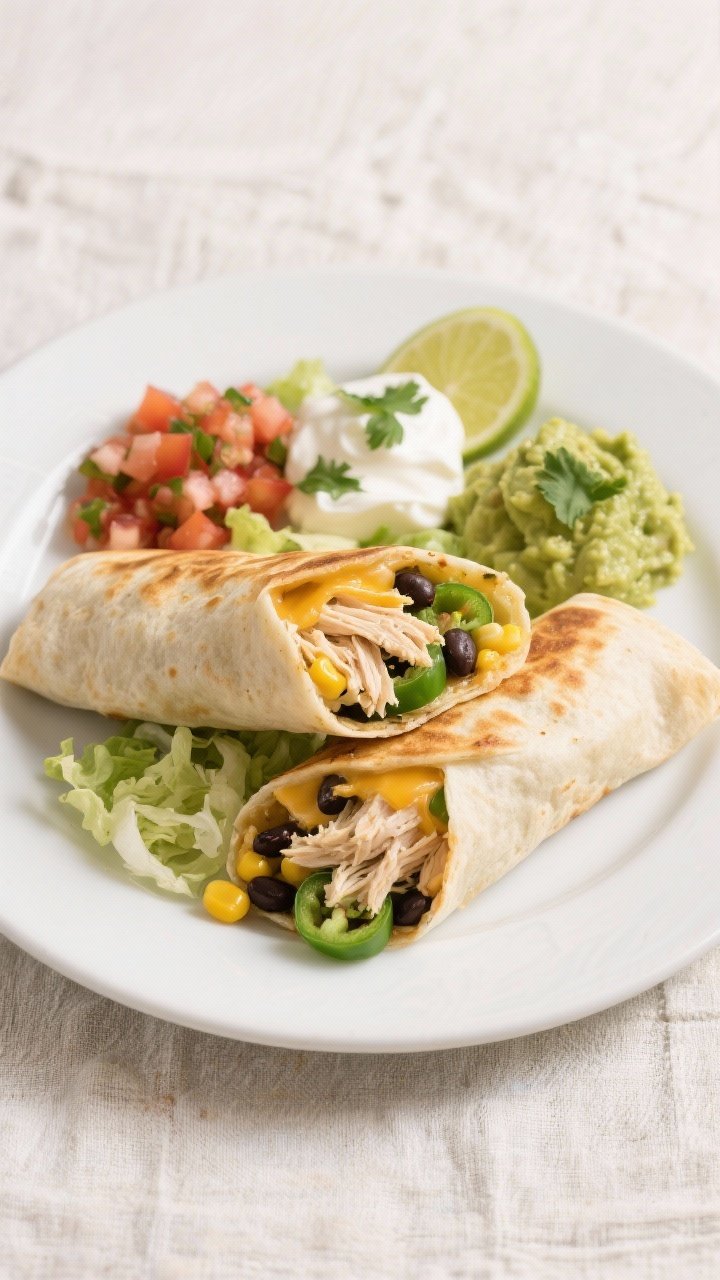
- Toppings for serving: Shredded lettuce, pico de gallo, guacamole, sour cream, hot sauce
Instructions
- Preheat the oven: Set to 425°F (220°C). Line a baking sheet with parchment paper and lightly oil it.
- Make the filling: In a large bowl, combine shredded chicken, onion, garlic, green chiles, salsa, cream cheese or sour cream, 1 cup of shredded cheese, black beans, and corn. Add chili powder, cumin, smoked paprika, oregano, salt, and pepper.
Mix until everything is evenly coated.
- Warm the tortillas: Wrap the stack in a damp paper towel and microwave 30–45 seconds until pliable. This prevents tearing and helps with rolling.
- Assemble the chimichangas: Place a tortilla on a clean surface. Spoon about 1/2–3/4 cup of filling in the center.
Fold the sides in, then roll up from the bottom tightly to create a neat bundle. Repeat with remaining tortillas and filling.
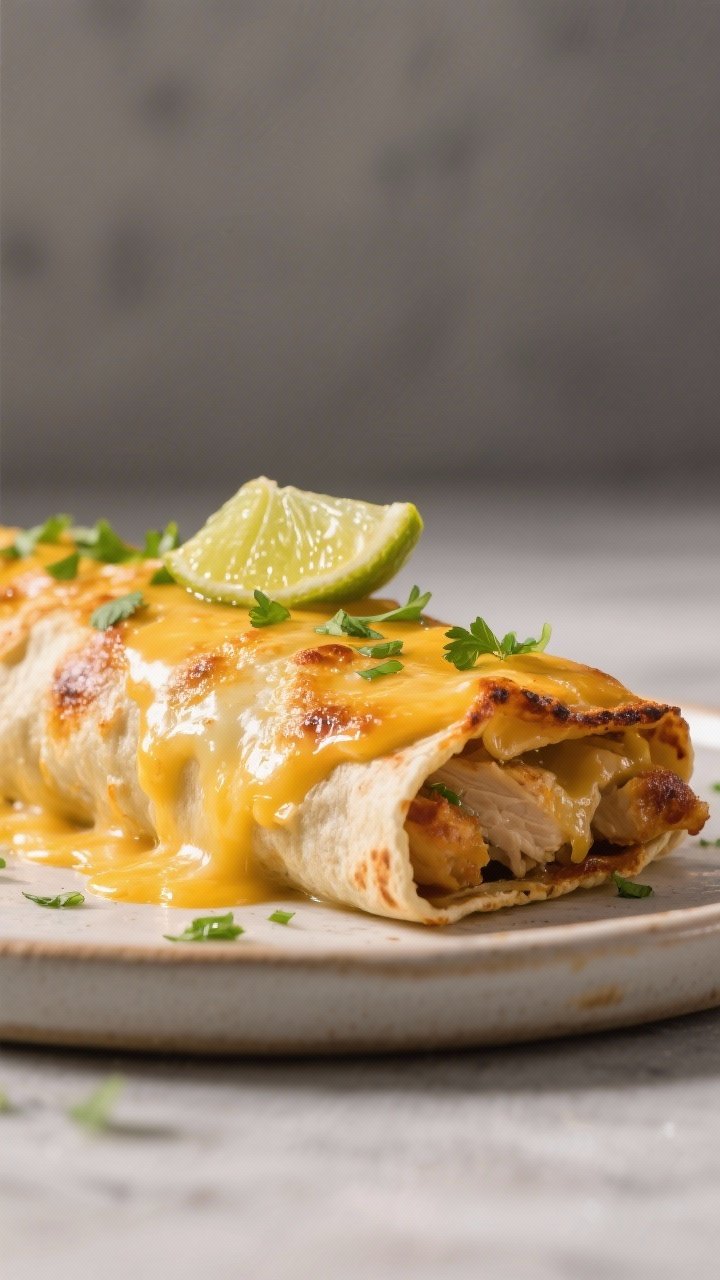
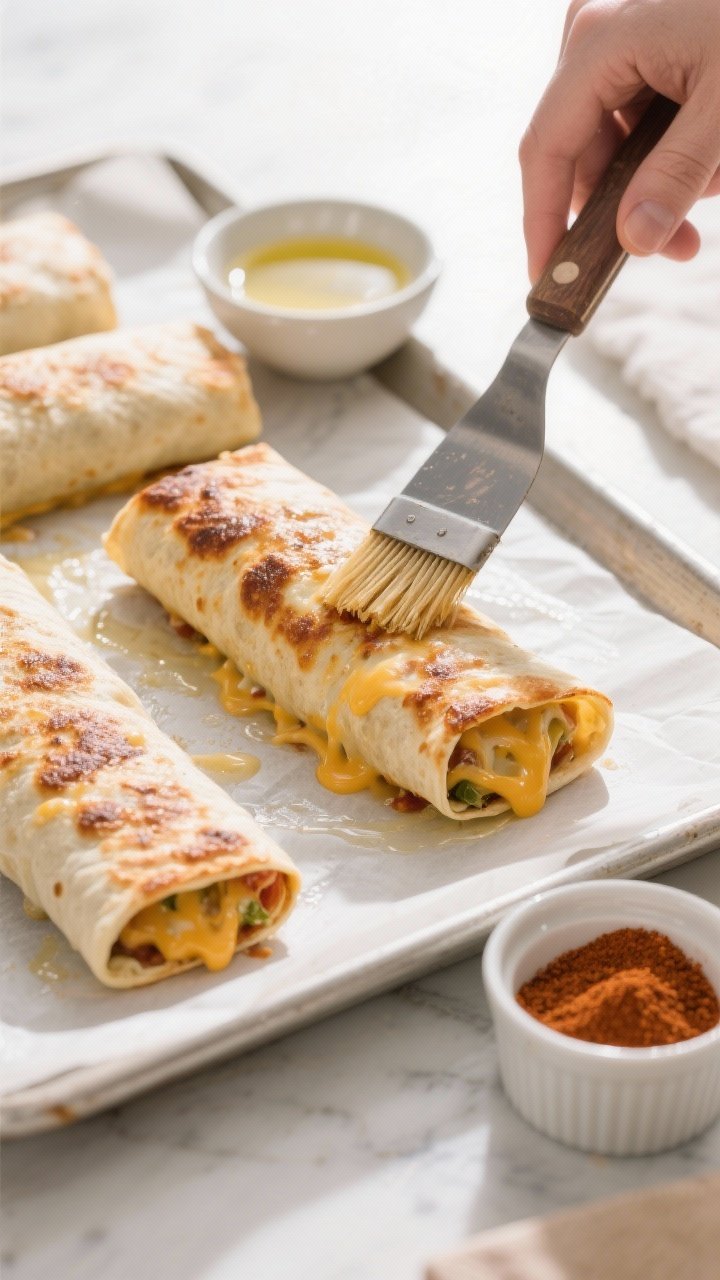
- Oil and top: Arrange seam-side down on the prepared baking sheet. Brush or spray each chimichanga lightly with oil.
Sprinkle the remaining 1/2 cup cheese over the tops for a golden, cheesy crust.
- Bake: Bake for 18–22 minutes, flipping once at the 12-minute mark for even crisping. They’re done when the tortillas are deep golden and crisp at the edges.
- Finish and serve: Squeeze fresh lime juice over the chimichangas and sprinkle with cilantro. Serve with lettuce, pico, guacamole, and sour cream.
How to Store
- Fridge: Cool completely.
Store in an airtight container for up to 4 days. Reheat at 400°F (205°C) for 8–10 minutes to re-crisp.
- Freezer (unbaked): Assemble, place on a tray to freeze until solid, then transfer to a freezer bag. Bake from frozen at 400°F (205°C) for 25–30 minutes, flipping once.
- Freezer (baked): Cool, wrap individually, and freeze up to 2 months.
Reheat at 400°F (205°C) for 15–18 minutes.
- Sauce and toppings: Store separately to keep the chimichangas crisp.
Why This is Good for You
- Baked, not fried: You get that crunchy texture with far less oil and fewer calories.
- Protein-rich: Shredded chicken keeps you full and supports muscle repair.
- Fiber boost: Beans and corn add fiber and minerals. Use whole wheat tortillas for even more.
- Customizable nutrition: Adjust cheese and creamy ingredients to your goals without losing flavor.
Pitfalls to Watch Out For
- Soggy bottoms: Overly wet filling can soak the tortillas. If your salsa is watery, drain it or simmer to reduce.
- Tearing tortillas: Cold or small tortillas tear easily.
Use large, warmed burrito-size tortillas.
- Under-seasoning: Taste the filling and adjust salt, lime, and spices before assembling.
- Uneven crisp: Don’t crowd the pan, and flip halfway through. A light oil brush matters.
- Overfilling: Too much filling makes rolling difficult and can leak. Aim for 1/2–3/4 cup per tortilla.
Alternatives
- Protein swaps: Use shredded beef, ground turkey, or cooked shrimp.
For vegetarian, try seasoned jackfruit or sautéed mushrooms and bell peppers.
- Dairy-free: Use a plant-based cream cheese and dairy-free shredded cheese, or skip the creamy element and add extra salsa and mashed beans.
- Spice levels: Use mild green chiles and a mild salsa for less heat, or add chipotle, jalapeños, or hot sauce for more.
- Tortillas: Large flour tortillas crisp best. For gluten-free, use sturdy gluten-free wraps and handle gently. Corn tortillas are not ideal for rolling but can work if doubled and warmed thoroughly.
- Air fryer: Air fry at 375°F (190°C) for 10–12 minutes, flipping halfway.
Lightly oil first.
FAQ
Can I make these ahead?
Yes. Assemble up to 24 hours in advance, refrigerate, and bake just before serving. Brush with oil right before baking for best crispiness.
How do I keep them from bursting open?
Don’t overfill, fold the sides in snugly, and place seam-side down on the tray.
A toothpick can help hold them in place—just remove before serving.
What cheese works best?
Monterey Jack melts beautifully and has a mild flavor. Cheddar adds sharpness. A Mexican blend gives you the best of both.
Can I use rotisserie chicken?
Absolutely.
It’s a huge time saver. Shred it finely so it mixes well with the other ingredients.
How do I make them extra crispy?
Brush or spray a little extra oil, use a preheated baking sheet, and bake on the top rack for the last few minutes. Broil for 1–2 minutes at the end if needed, watching closely.
What sides go well with chimichangas?
Mexican rice, cilantro-lime rice, refried beans, a simple salad, or grilled corn are all great.
Chips and salsa never hurt.
In Conclusion
These oven-baked chicken chimichangas hit that perfect balance of crunchy, cheesy, and satisfying—without the hassle of deep frying. They’re quick to assemble, easy to customize, and freezer-friendly for busy days. Make a double batch, set out your favorite toppings, and let everyone build their ideal plate.
Simple, crispy, and full of flavor.
Printable Recipe Card
Want just the essential recipe details without scrolling through the article? Get our printable recipe card with just the ingredients and instructions.
Thanks! 🙂